Overview
Goal
A business requirement specified setting permissions on newly uploaded documents based on a managed metadata field in an Office 365 SharePoint Document Library. This is significantly easier to do with an OOTB action with a SP 2010 workflow, but we decided to use a SharePoint 2013 workflow for forward compatibility.
Obstacles
There were many, and no one site or post had all the answers, thus this post.
- Consuming and executing REST from a SharePoint 2013 workflow.
- Waiting for and comparing managed metadata fields on a new document.
- Looping through a collection of role assignments and deleting them through workflow REST calls.
First Steps
Allow Site to Make Elevated REST Calls from Workflow
Some of the REST calls require full control. You need administrative rights to enable the feature: Settings > Site Settings > Site Actions - Site Features > Workflows can use app permissions – Activate.

Generate and Determine ID(s) of Target Principal(s)
- Use the group or person on a test or real item somewhere so that SharePoint generates an ID.
- There may be a better way, but I used this REST command in a browser:
https://mySubDomain.sharepoint.com/sites/contoso/_api/web/siteusers
From there, you can use a JSON viewer, use the raw returned XML or copy it into a Visual Studio XML file which parses and syntax highlights it nicely.
- We need the Id for the target group. In this case my group is spDocumentLevel1 (see the <d:Title> tag) and my Id is 50. Here is a snippet of the returned XML.
…
<content
type="application/xml">
<m:properties>
<d:Id
m:type="Edm.Int32">50</d:Id>
<d:IsHiddenInUI
m:type="Edm.Boolean">false</d:IsHiddenInUI>
<d:LoginName>c:0-.f|rolemanager|s-1-5-21-1072394957-3547065719-591965004-302694133</d:LoginName>
<d:Title>spDocumentLevel1</d:Title>
<d:PrincipalType
m:type="Edm.Int32">4</d:PrincipalType>
…
Workflow Steps
- Open the site in SharePoint Designer.
- Create the a new SharePoint 2013 workflow against the desired list.
- Check "Start the workflow automatically when an item is created".
Wait for Metadata by Waiting for Check in
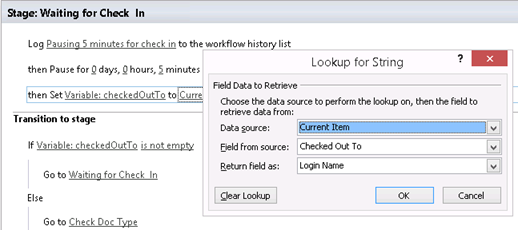
We set the workflow to start for all new documents, but the workflow starts as soon as the document has been uploaded, before the user has a chance to save the metadata. Since our document library is set to require check out, we can wait for user to check the document in.
Tip: for any SP 2013 workflow against a list or library requiring check out, be sure to clear the "Automatically update the workflow status to the current stage name". Updating the status means updating the metadata of the list item which we want to avoid:
Then we add a Stage to wait for the Checked Out To field to be empty:
Checking the Managed Metadata
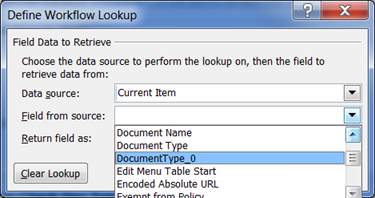
Creating a Managed Metadata field actually creates a second field, usually with a "_0" appended. This field stores a copy of the lookup data value from the hidden site collection taxonomy list along with the GUID so that it looks something like this: Manual|1304b2eb-d9fa-4885-961f-2763af001bfd
We just want to check that the value is "Manual". The field we want is DocumentType_0
The whole stage looks like this:
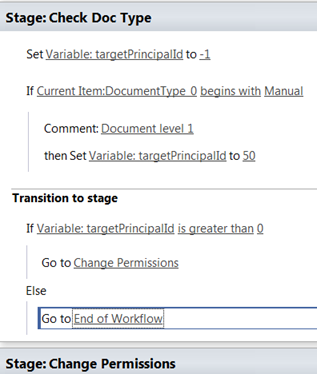
The value of 50 comes from the "First Steps" above.
Changing Permissions Set up
So now we need to make some REST calls to the site from our workflow to change the permissions of the new document. The steps are
- Break inheritance.
- Get all the existing roles for the current item.
- Loop through all the roles and delete them one by one.
- Set the role(s) that we want.
Before we make the REST calls, we need two different request headers.
- Build a dictionary called JSONRequestHeader with two items, Accept and content-type, both with a value of application/json;odata=verbose:
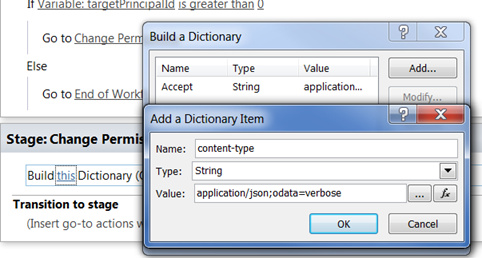
- Build a dictionary called JSONDeleteHeader with a single item of X-HTTP-Method with a value of DELETE
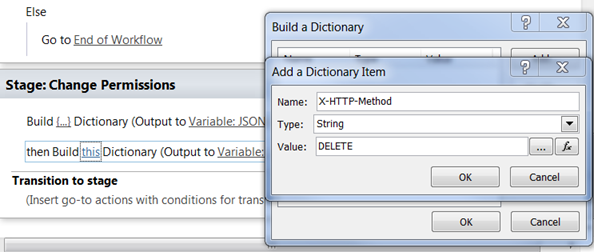
Make REST Calls
REST calls from the workflow require elevated privileges, so we will use an "App Step" just after the two Build actions.

If the App Step ribbon item is disabled, set the site feature as detailed above.
Break Inheritance
Our first REST call allows custom permissions on the current item using the breakroleinheritance call of the current item. The URI template is
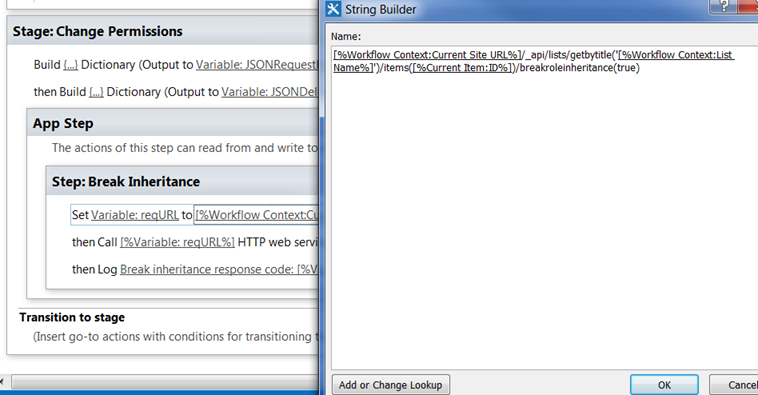
<sitepath>/_api/lists/getbytitle('<list name>')/items(<item ID>)/breakroleinheritance(true)
Here are the steps to get to the place in the image below. The String Builder is for setting the reqURL value.
- Set the string reqURL variable to the appropriate value using the general template above. See String Builder three images below.
- Click Ribbon - Action > Call HTTP Call HTTP Web Service.
- Set the URL to reqURL
Change the RequestType to POST and set the RequestHeaders to JSONRequestHeader
- Hover over the Call … action
Click the down arrow > properties

Set the values:
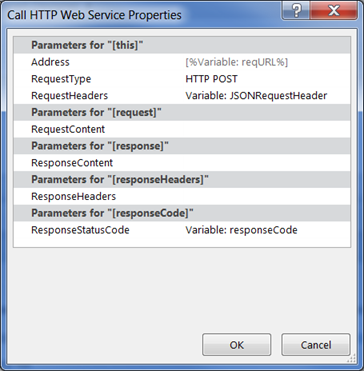
- I recommend logging the responseCode for debug purposes. You may also want to log the actual reqURL before the HTTP call for debugging.
Remove the Roles
- Create a new step within the app step under the Break Inheritance step named "Remove Roles".
Get all roles in the JSONResults dictionary variable.
- Create another step within "Remove Roles" called "Get All Roles".
- Copy the all three actions from the "Break Inheritance" step and paste them into the "Get All Roles" step.
- The URI template is
<sitepath>/_api/lists/getbytitle('<list name>')/items(<item ID>)/roleassignments
This means that we just need to replace breakroleinheritance(true) with roleassignments within the reqURL String Builder.
We need the responseContent
- Hover over the Call … action.
- Click the down arrow > properties.
- Click the ResponseContent dropdown and Create a new variable… called JSONResults.
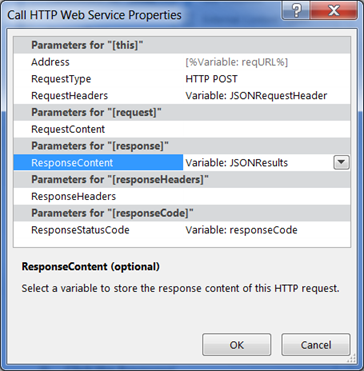
- After the Call … action, add this workflow action: Get "d/results" from JSONResults output to new dictionary variable called allRoles.
- Another workflow action: Count items in allRoles output to new variable countRoles.
- Set the cursor outside of the Get All Roles step, but within the "Remove Roles" step.
- Set a new workflow integer variable called index to 0.
Loop through each Role with an assigned permission
- Ribbon – Loop > Loop with condition > Set header to "Remove Each Role"
- Loop while index is less than countRoles.
- Workflow action: Get d/results(index) from JSONResults output to a new dictionary variable called roleItem.
- Workflow action: Get PrincipalId from roleItem output to new integer variable called principalId.
- Copy the three steps from Break Inheritance into the Loop and paste them to the bottom of the Loop.
- The URI template is
<sitepath>/_api/lists/getbytitle('<list name>')/items(<item ID>)/roleassignments(<principal Id>)
Here is the String Builder:

- In the Call ... action, change the RequestHeaders property value to JSONDeleteHeader
- Workflow action: Calculate index plus 1 output to calc
- Workflow action: set index to calc
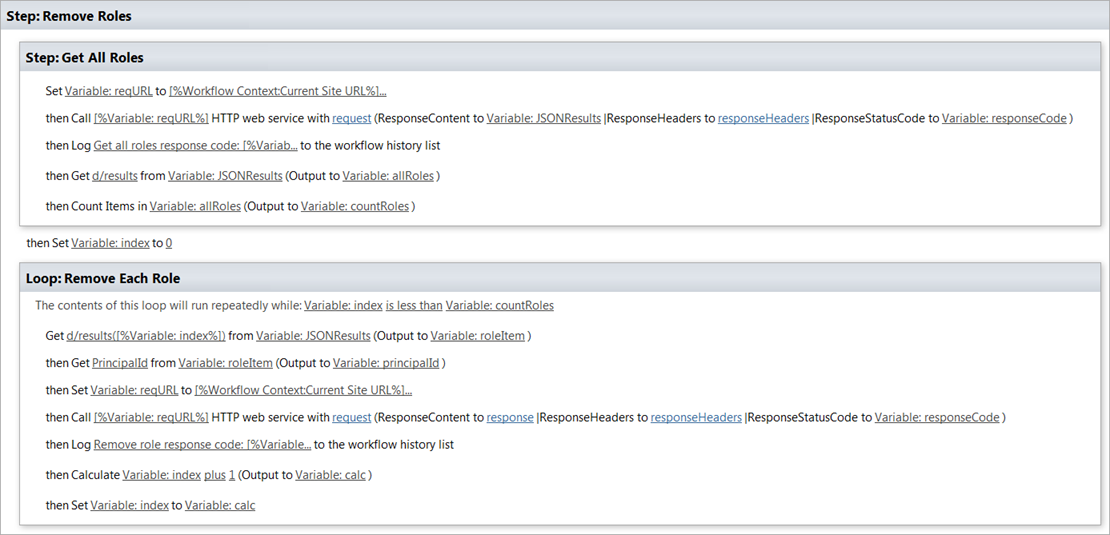 Note that after loop executes properly, only administrators and processes with elevated privileges such as this workflow (see Trust below), have access to the item.
Set Role
We are granting our group full control permissions which always has a roleDefId of 1073741829 in SharePoint.
- Create a new step within the App Step called Set Role.
- Paste the three actions from the Break Inheritance step.
- The URI template is
<sitepath>/_api/lists/getbytitle('<list name>')/items(<item ID>)/roleassignments/addroleassignment(principalid=<target principal Id>,roleDefId=1073741829)
Here is the String Builder:

Finalize and Publish
- In the transition stage, Go to End of Workflow
- Publish > Accept that App Steps run with different credentials.
- Since we are not updating the workflow stages, you may want to remove the workflow column from default document library view.
Grant Full Permission to Workflow
The Break Inheritance REST call works, but Get All Roles is generates a response code of Unauthorized without elevating the permissions for the call. You must be an admin or have full control to perform these steps.
- Settings > Site Settings > Users and Permissions – Site app permissions
- Copy the client value the App Identifier for the Workflow entry. This is the value between the second pipe symbol | and the @ sign:

In this case, we want 8be90517-bb48-42c1-87dc-a1d7070b6bae.
- Navigate to the Grant permission to an app page, something like https://mySubDomain.sharepoint.com/sites/contoso/_layouts/15/appinv.aspx
- Paste the client id in the App Id field > Lookup. The next four text boxes populate with the Title of Workflow, etc.
- In the Permission Request XML text box, enter
<AppPermissionRequests>
<AppPermissionRequest
Scope="http://sharepoint/content/sitecollection"
Right="FullControl" />
</AppPermissionRequests>
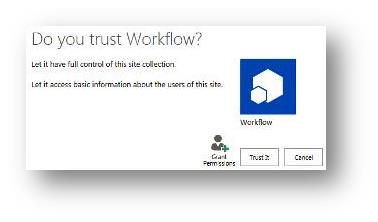
- Click Create > Trust It
Resources
Users, groups, and roles REST API reference
How to: Set custom permissions on a list by using the REST interface
Create a SharePoint site using REST in workflow with SharePoint Designer
Looping on List Items in SharePoint Designer Workflow 2013